How to Get the Most Out of Being an Ass
The Bard’s Tale takes a simplified approach to its RPG mechanics, meaning you generally shouldn’t have to fret too much over developing a specific fighting strategy or perfect allocation of your experience points. On the whole, you should be fine playing the game however feels most comfortable or fun for you. Still, there are certain elements of the gameplay that could stand to be illuminated such as dialogue options, side quests, and even a few of the basics.
Part I: A Few of the Basics
One of the drawbacks of the Android port of The Bard’s Tale is that a number of the game’s core mechanics go completely unexplained. There’s something to be said for games that teach through doing, but, The Bard’s Tale just feels a little bit like it’s missing its manual. Here are some of the things I wish I’d been told early on.
Saving
You’ll find floating, glowing books fairly frequently, usually at the start of new areas. Walk over them to be presented with the option to save. Simple enough, but it’s worth knowing that, for the Android version, there is also a “save state” system in place. If you return to your phone’s home screen or switch to another app mid-game, the game will keep a record of where you were and, next time you run it, you’ll be presented with the option at the title screen to resume or discard the rescued game. In fact, unless you go to the bother of quitting out to the main menu before you close the app, it will generally hold onto your progress, even if you’ve just hit up a save point.
This feature is worthwhile if you’re playing on the go and have to stop with no save points in reach. However, don’t forego save points entirely as I ran into a handful of times in which, for whatever reason, my game wasn’t salvageable and I lost my progress. (Incidentally, there is an autosave option in the options menu, but this is misleading as all turning this on does is make it so the game automatically saves for you whenever you run over a save point).
Interface and Basic Commands
You’re given a tutorial early on about how to summon allies, but aside from that, little gets explained.
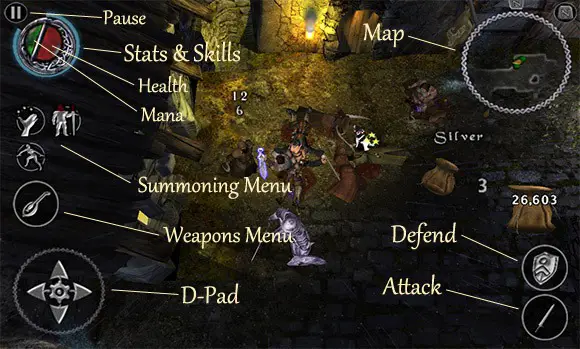
The map is in the upper-right corner. Red dots are enemies, green are allies, yellow are goals, blue are save points. Tap the map to alternate between sizes or get rid of it altogether.
Touching the emblem in the top-left corner brings up a detailed menu of your stats and skills. The emblem itself provides a general representation of your current health (the red part) and mana (the green). The light blue outline around the emblem must complete one revolution before you gain a level. The little pause button just above the emblem opens the options menu, which contains, among other things, a “Help” option that provides a breakdown of commands.
Touching the lute icon opens a menu for equipping weapons. Equip melee weapons by choosing the sword icon, then the type of weapon you want. The fist icon opens up a selection of weapons (that you’ll obtain quite a bit later) with their own unique characteristics as well as your bow (once you get one). From here, you can also choose to fight bare-handed (which you never have any reason to do).
The crystal icon is for performing a heal spell. Offensive spells that you’ll learn from defeating bosses will also go here. All of these use no mana, but cost adderstones, which can be collected around the game world. You choose between three power levels with these spells; the higher levels require more adderstones. Different effects come with the different power levels. For example, healing at level I completely heals the Bard, while levels II and III heal him as well as his party.
Go to Part II: Strategy Simplified –>


