


Have you ever felt like your Android phone was slowing you down, or that it had all this unnecessary clutter and could perform much better? Well, if you are running an Android phone on firmware locked to the vendor then you are low on options. The manufacturer might offer customization options and some flexibility, but that’s totally dependent on them. However, if you want something simpler, much smoother, and specific to your needs then you can go for Android OS customization.
Customizing an Android OS is akin to giving yourself options. Much like you’d choose an essay writing service based on the flexibility that it offers, different users have different needs that they might want their smartphones to fulfill. Since this flexibility is what many users need but don’t have on locked phones, ROM customization presents the perfect opportunity. You can do this if you really need that alternative device, or if you just want to do a fun project.
Let’s dive straight into this beginner-friendly guide:
What Are the Reasons for Android OS Customization?
Android is the most popular and widespread mobile OS in the world, with an estimated 79% market share according to the Quarterly Worldwide Mobile Phone Tracker report.
You’d probably want the option of having professional writing help at your fingertips if you get stuck in a “Who will do my essay?” scenario. The same reasoning applies to Android OS customization as it provides flexibility. Here are some reasons why you would customize an Android OS:
1. Unlock the Latest Android Features on Older Phones
Customizing your Android OS can help breathe new life into older devices. Often, smartphone manufacturers may no longer provide updates for aging models. By customizing your OS, you can get access to the latest Android features that may otherwise be out of reach.
2. Embrace a Closer-to-Stock Android Experience
Most consumer tablets and smartphones come preloaded with bloatware—those unwanted apps that hog storage space. In some cases, these pre-installed applications might even carry security vulnerabilities themselves.
Customizing your OS can bring you closer to this stock experience, resulting in a cleaner, faster, and more streamlined interface. This can also contribute to better battery life, as lighter applications are typically part of the stock experience.
3. Robust Hardware and Software Security
Custom Android OS is closely tied to robust hardware security, especially in single-purpose device deployments. It empowers you to exert precise control over user access to hardware components. For instance, you can restrict certain functions, such as blocking access to the 3.5mm audio jack or deactivating the volume rocker.
Furthermore, custom OS administrators can establish stringent application usage policies, thwarting any attempts at arbitrary code execution and enhancing overall software security.
4. Enhance Privacy and Control
In an era where data privacy is paramount, Android OS customization empowers you with greater control. You can fine-tune app permissions and even create a “Google-free” experience, reducing the data your device shares with external parties.
5. Tailored Hardware and Peripheral Support
Android generally provides support for a wide range of hardware and peripherals. However, there are instances where specific hardware functionalities are required, particularly for unique or custom devices. Custom Android OS allows you to integrate new functionalities into your smartphone.
6. Enjoy the Thrill of a DIY Project
Lastly, customizing your Android OS is simply a fun and rewarding project. You’ll get to know how your device works, experiment with various features and truly make your smartphone your own.
Considerations for a Custom Android OS
You are always advised to conduct due diligence on a professional writing website before seeking their help, as an example, reading this essayusa review. Likewise, it is also important to be prudent before taking the plunge into Android OS customization by reading about the experiences of others or checking sites like Quora. Here are some things to consider:
I. Google’s SafetyNet Attestation API
The deployment of custom Android OS on GMS-certified devices may encounter roadblocks associated with Google’s SafetyNet Attestation API. This API, offered by Google, provides real-time insights into device tampering and security status. Activities such as rooting or unlocking a device’s bootloader can lead to the failure of SafetyNet Attestation, causing certain apps reliant on the API to refuse operation.
To enable GMS apps and services, including access to the SafetyNet API, a device must pass the Compatibility Test Suite (CTS). This test checks the compatibility of the device running the new OS with Android’s predefined standards. It’s an essential consideration, particularly for single-purpose use cases involving Google APIs or apps.
II. Potential Risks and Device Compatibility
The deployment of a custom Android OS should be approached cautiously to mitigate potential pitfalls. These risks can fluctuate depending on how the OS is constructed and the source code’s origin. Some manufacturers, like Khadas, release source code to safeguard customers from such risks. However, if you’re acquiring code from AOSP, it necessitates fine-tuning to align with your hardware’s compatibility.
III. Identifying Trustworthy Custom Android OS
The Android Compatibility Test Suite (Android CTS) is important in evaluating compatibility. It determines if a custom OS built on open-source AOSP code aligns with Google’s compatibility standards outlined in the Android Compatibility Definition Document (Android CDD).
While passing the CTS is a positive sign of compatibility, it doesn’t guarantee that your custom OS is devoid of vulnerabilities, or backdoors, or properly configured according to your organization’s security prerequisites. Passing the CTS also doesn’t grant permission to distribute Google Mobile Services (GMS) or ensure your devices will pass SafetyNet checks when running the custom OS. Both GMS and SafetyNet require an active Mobile Application Distribution Agreement (MADA) with Google.
IV. Reverting to Stock ROM Considerations
Whether you can seamlessly return to a Stock ROM without complications depends largely on the device manufacturer’s policies. If the bootloader is locked, flashing a custom Android OS becomes impossible. In some instances, manufacturers may offer limited bootloader relocking capabilities, ensuring that a device remains permanently unlocked after adopting a custom Android OS.
Understanding the Workflow for Customizing an Android OS
Customizing your Android OS involves several steps. Let’s dive into the detail.
Step 1: Unlocking the Bootloader
The bootloader is the first piece of software that runs when your device starts up. It checks the integrity of the operating system and decides whether to boot it or not. To unlock the bootloader:
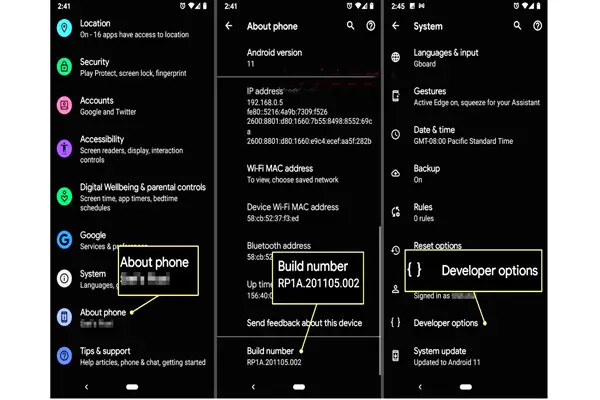
- Enable Developer Options: Go to your device’s settings, tap on “About Phone,” and find the “Build Number.” Tap on it seven times to enable Developer Options, as shown in the image above.
- Enable OEM Unlocking: In Developer Options, enable “OEM Unlocking.” This allows you to unlock the bootloader.
- Connect to a Computer: You’ll need to connect your device to a computer with a USB cable.
- Use Fastboot: Fastboot is a command-line tool used for various bootloader operations. Open a command prompt or terminal on your computer and use fastboot commands to unlock the bootloader.
This process will wipe your device, so ensure you have backups of your important data.
Step 2: Installing a Custom Recovery (TWRP)
A custom recovery is essential for tasks like installing custom ROMs and creating backups. Team Win Recovery Project (TWRP) is user-friendly and widely supported. Here’s how to install TWRP:
Download TWRP: Visit the official TWRP website and download the TWRP image file for your device.
Enable USB Debugging: In Developer Options on your device, enable “USB Debugging.
Connect to a Computer: Connect your device to your computer via USB.
Use ADB: Android Debug Bridge (ADB) is a tool that communicates with your Android device. Open a command prompt or terminal on your computer and use ADB to install TWRP.
Step 3: Choosing a Custom ROM
Selecting the right custom ROM is crucial, as it determines the features and interface of your customized Android OS. Here are some popular options:
- LineageOS: Known for its stability and wide device support, LineageOS provides a close-to-stock Android experience with added customization options.
- ArrowOS: ArrowOS focuses on delivering a smooth and stable experience while offering customization features to tweak your device.
- Stock+ ROM: If you prefer a closer-to-stock Android experience with a few enhancements, stock-based custom ROMs might be your choice.
Before proceeding, ensure that you’ve downloaded the custom ROM ZIP file to your device.
Step 4: Flashing the Custom ROM
Flashing the custom ROM is the final step in creating your customized Android OS. Follow these steps:
Boot into TWRP: Power off your device. Then, press and hold the volume up button and power button simultaneously to boot into TWRP.
Backup Your Data: Before proceeding, create a backup of your existing system using TWRP’s backup feature.
Wipe Data: In TWRP, go to “Wipe” and perform a “Factory Reset” to ensure a clean slate.
Install the Custom ROM: In TWRP, navigate to “Install” and select the custom ROM ZIP file you downloaded earlier. Swipe to confirm the flash.
After the installation is complete, reboot your device.
Congratulations! You’ve successfully customized your Android OS.
Embark Today on Your Android Customization Journey
With these fundamental concepts in mind, you’re ready to dive headfirst into your Android OS customization adventure. Whether you’re aiming to revive an older device, enhance privacy, or simply enjoy the process of personalization, this guide has provided you with a solid starting point.
Android OS customization is a great project for anyone to do, whether a coder or not. With the right resources and determination, and with this tutorial as your starting point, you can craft a unique solution to the smartphone challenges you face.